Last ATAK Pictures' feature film 'The Musicals' is to be the first production by the company to use Computer Generated Imagery (CGI). When discussions began, the intention was to create a 3D version of the company logo to start the film, but once director Andrew Davidson saw the test footage of the earth model Alun Jones had created, he envisioned a larger and much more complicated sequence. Together with script editor Andrew Elkin a new beginning was drawn up for the film, and Alun would now be creating an entire CG sequence that will be the first two minutes the audience will see when the film starts.
In this first article, Alun explains the process by which he started work and the creation of a 3D Planet Earth.
Blue Marble: Creating The Earth In 3D Funkyness
By Alun Jones - 'The Musicals' Visual Effects Director
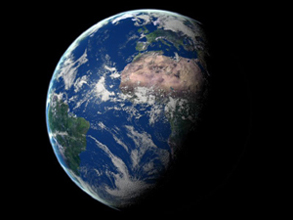
This document is not intended to be a step by step tutorial but a description of the making of the scene. The maps used for textures were found at the Nasa Blue Marble web site.
1. Geometry
First off I created a sphere with the following attributes:
• Name: Surface / Radius: 12760 / Segments: 98
This will be the basis of the earth, where the main textures will go.
Then I selected Edit > Clone and chose create a copy. I named it "Clouds".
In the Modify tab on the right side of the workspace and under parameters, I entered:
• Radius: 12780 / Segments: 98
This makes the cloud layer slightly bigger than the earth so we can have fun with a simulated weather system layer on top.
Again, I select Edit > Clone and chose create a copy. Named it "Atmosphere".
In the Modify tab on the right side of the workspace and under parameters, I entered:
• Radius: 12980 / Segments: 64
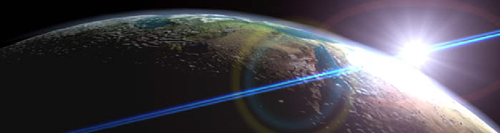
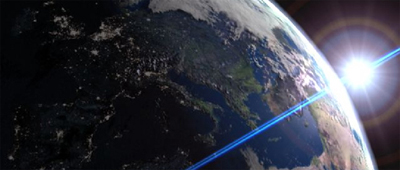
This is to give an atmospheric glow, which was missing in the version 1 tests, and made the earth look a bit silly in the lens flare.
And we're done with geometry already!
2. Lighting
I created one target directional light that points to the centre of the spheres. I called it "Sun diffuse". Made it white. Under General parameters, unchecked "Specular". This is the Diffuse light.
Then I selected Edit > Clone and chose create a copy. Named the new light "Sun Specular". Made it yellow (R250 G227 B226). I made sure Diffuse was unchecked. This is the specular light.
I then clicked on "Exclude..." and added Clouds in the exclude list to avoid that the clouds look like cigarette smoke because they are illuminated by a yellowish light.
Using 2 different lights for diffuse and specular ensure that there is a touch of warm yellow without having the whole scene "dirtied" by this colour.
Under Rendering > Environment I made sure ambient light was black (i.e. no ambient light).